trader joe’s brined turkey cooking instructions
Trader Joe’s Brined Turkey Cooking Instructions: An Overview
Cooking a Trader Joe’s Brined Turkey is a straightforward process that ensures juicy‚ flavorful results. Preheat your oven to 400°F‚ roast for 30 minutes‚ then reduce heat to 325°F. Baste every 30 minutes‚ and let the turkey rest before carving. Follow these steps for a perfectly cooked holiday meal.
Trader Joe’s Brined Turkey is a convenient and flavorful option for home cooks‚ offering a pre-brined‚ all-natural young turkey; This product is seasoned with a blend of spices and herbs‚ ensuring a juicy and aromatic result. The brining process enhances the turkey’s moisture and flavor‚ making it a popular choice for special occasions like Thanksgiving. Available in various sizes‚ including whole and half turkeys‚ it caters to different household needs. The turkey comes ready to roast‚ with minimal preparation required. Cooking times vary based on size‚ but a 12-14 pound turkey typically roasts for 3 to 4 hours. This product is ideal for those seeking a stress-free‚ delicious centerpiece for their holiday meals.
Key Benefits of Using a Brined Turkey

Using a brined turkey offers several advantages that elevate the cooking experience. Brining enhances moisture retention‚ resulting in a tender and juicy turkey even when roasted. The process infuses the meat with rich flavors from the brine‚ reducing the need for additional seasoning. This method is particularly beneficial for lean meats like turkey‚ ensuring it stays succulent throughout cooking. Additionally‚ brining simplifies the cooking process‚ as the turkey comes pre-seasoned and requires minimal preparation. The even distribution of flavors and moisture makes basting less critical‚ though it can still be done for extra crispiness. Overall‚ a brined turkey provides a hassle-free way to achieve a delicious‚ professional-quality meal at home.
Understanding the Cooking Process
Cooking a Trader Joe’s Brined Turkey involves a straightforward yet precise process to ensure optimal results. The turkey is pre-brined‚ meaning it’s already seasoned and ready for roasting. Start by preheating your oven to 400°F and place the turkey on a roasting rack in a large pan. Roast for 30 minutes at this high temperature to crisp the skin‚ then reduce the heat to 325°F for the remaining cooking time. Baste the turkey every 30 minutes to maintain moisture and promote even browning. The total cooking time varies depending on the turkey’s size‚ typically ranging from 3 to 4 hours for a 12-14 pound bird. Proper internal temperature checks ensure food safety‚ while resting the turkey before carving allows juices to redistribute‚ resulting in a tender and flavorful final dish.

Preparation Before Cooking
Thaw the turkey completely‚ remove giblets‚ and pat dry. Season if desired‚ though the brine already adds flavor. Ensure the turkey is room temperature before roasting.
Thawing Instructions for Trader Joe’s Brined Turkey
To ensure a safe and even thawing process‚ place the turkey in its original packaging on a leak-proof tray in the refrigerator. Allow 24 hours of thawing time for every 4-5 pounds of turkey. For example‚ a 12-14 pound turkey will need 2-3 days to thaw completely. If you’re short on time‚ you can thaw the turkey in cold water. Submerge the packaged turkey in a large container of cold water‚ changing the water every 30 minutes. This method requires about 30 minutes of thawing per pound. Never thaw the turkey at room temperature‚ as this can promote bacterial growth. Once thawed‚ the turkey is ready for preparation and cooking. Always handle the turkey safely to prevent contamination.
Removing Giblets and Preparing the Turkey
Before cooking‚ remove the turkey from its packaging and carefully take out the giblets and neck‚ which are typically found in the cavity. Rinse the turkey under cold water‚ both inside and out‚ to ensure cleanliness. Pat the turkey dry with paper towels‚ including the cavity‚ to promote even cooking. If necessary‚ trim any excess fat around the tail or neck area. Once prepared‚ the turkey is ready for seasoning or cooking as desired. This step ensures the turkey is clean and ready for the next stages of preparation‚ helping to achieve the best flavor and texture during roasting.
Seasoning the Turkey (Optional Enhancements)
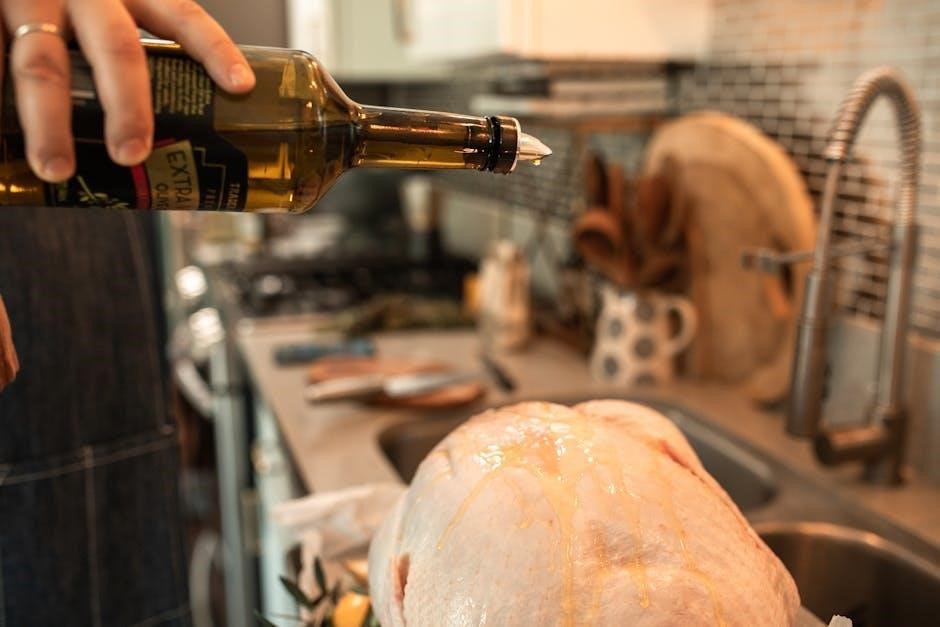
While Trader Joe’s Brined Turkey is pre-seasoned with a delicious blend of spices‚ you can enhance its flavor further. Rub the turkey with olive oil or melted butter to keep it moist and add richness. Sprinkle additional seasonings like garlic powder‚ paprika‚ or dried herbs (e.g.‚ thyme‚ rosemary‚ or sage) evenly over the skin. For extra aroma‚ stuff the cavity with onion quarters‚ garlic cloves‚ or citrus slices. You can also tuck fresh herbs like parsley or rosemary under the skin for added depth. These optional enhancements allow you to personalize the turkey’s flavor while maintaining the brined goodness. Seasoning should be done just before roasting to ensure maximum impact.
Roasting Instructions
Preheat oven to 375°F. Place turkey in roasting pan‚ breast side up. Roast until internal temperature reaches 165°F. Baste occasionally for moisture and even browning. The turkey is pre-brined and seasoned‚ so focus on achieving a golden-brown finish.
Preheating the Oven and Initial Setup
Start by preheating your oven to 375°F (190°C) to ensure consistent roasting. Place the turkey in a roasting pan‚ breast side up. Since the turkey is pre-brined‚ no additional seasoning is needed unless desired. Position a roasting rack in the pan to elevate the turkey‚ promoting even browning and airflow. Tent the turkey loosely with foil‚ especially over the wings and legs‚ to prevent over-browning during the initial cooking phase. Remove the foil for the last hour of roasting to crisp the skin. This setup ensures a balanced roast with juicy meat and a golden finish.
Placing the Turkey in the Roasting Pan
Place the turkey in a large roasting pan‚ preferably one with a rack to elevate the bird. Position the turkey breast side up to ensure even cooking. Pat the turkey dry with paper towels to remove excess moisture‚ which helps create a crispy skin. Tuck the wings under the turkey and tie the legs together with kitchen twine if needed. Avoid overcrowding the pan‚ as this can prevent air from circulating evenly. If using a rack‚ ensure the turkey is centered and stable. This setup promotes proper airflow‚ preventing the turkey from steaming instead of roasting. Proper placement ensures the turkey cooks evenly and prevents it from sticking to the pan.
Roasting Times and Temperatures
Preheat your oven to 325°F (160°C). For a Trader Joe’s brined turkey‚ roasting times vary based on weight. A 12-14 pound turkey typically takes 3-3½ hours‚ while a 20-24 pound turkey may need 4-4½ hours. Use a meat thermometer to ensure the internal temperature reaches 165°F (74°C) in the thickest part of the breast and 180°F (82°C) in the thigh. Baste the turkey periodically to maintain moisture and promote even browning. Avoid opening the oven too frequently‚ as this can disrupt the cooking process. Check the turkey during the last hour to ensure it doesn’t overcook. Proper temperature control ensures a juicy‚ evenly cooked turkey with a golden-brown finish.
Handling Smoke During Cooking
Handling smoke while cooking a Trader Joe’s brined turkey is crucial for a pleasant kitchen environment. Start by ensuring good ventilation—open windows and use an exhaust fan to circulate air. If smoke arises‚ it may be due to the turkey’s fat rendering or the brine’s reaction to heat. To minimize this‚ place the turkey in the center of the oven to avoid direct heat from the top or bottom elements. Covering the turkey with foil during cooking can also reduce smoke and promote even browning. Additionally‚ adding a small amount of liquid‚ like broth or water‚ to the roasting pan can help keep the turkey moist and reduce smoking. Monitor the turkey closely to address any smoke issues promptly‚ ensuring a smooth and enjoyable cooking process. Remember‚ managing smoke effectively enhances both the cooking experience and the final flavor of your turkey.
Basting the Turkey
Basting the turkey ensures moisture and enhances flavor. Use pan juices or melted butter‚ basting every 30 minutes. This promotes even browning and a golden‚ delicious finish.
When to Baste the Turkey
Baste the turkey every 30 minutes during roasting to maintain moisture and promote even browning. Start basting after the first hour to avoid washing off seasonings. Gently pour pan juices or melted butter over the turkey‚ ensuring the skin stays golden. Avoid excessive basting in the final hour to allow the skin to crisp. Consistent basting ensures a juicy‚ flavorful bird with a beautiful finish. Always use a basting tool or spoon to drizzle evenly. This step enhances the overall texture and appearance‚ making the turkey a delicious centerpiece for your meal.
What to Use for Basting
For basting the turkey‚ use the pan juices that accumulate during roasting‚ as they are rich in flavor from the brine and seasonings. You can also melt butter and brush it over the turkey for added richness. If desired‚ mix in a small amount of olive oil or broth to enhance moisture. Additionally‚ wine or stock can be used to add depth to the basting liquid. Avoid using too much salt‚ as the brine already provides ample seasoning. For extra flavor‚ herbs like thyme‚ rosemary‚ or garlic can be added to the basting liquid. Always use a basting tool or spoon to evenly distribute the liquid. This ensures the turkey stays juicy and develops a golden-brown crust. Be creative with your basting liquid to suit your taste preferences!
Tips for Even Basting
For even basting‚ use a basting tool or spoon to distribute the liquid evenly over the turkey. Baste every 30-45 minutes to ensure consistent moisture and flavor. Tenting the turkey with foil during cooking can help prevent over-browning while allowing the basting liquid to infuse evenly. Avoid over-basting‚ as this can lead to steaming instead of roasting. Rotate the roasting pan occasionally to ensure all areas of the turkey receive equal attention. Baste the breast and thighs separately to target areas that may dry out faster. Use the pan juices to enhance the basting liquid for added flavor. Proper basting ensures a juicy‚ evenly cooked turkey with a golden-brown finish. Consistency is key for the best results!
Resting the Turkey
Resting the turkey allows juices to redistribute‚ ensuring tender meat. Place the turkey on a wire rack in a warm place‚ uncovered‚ for 30-45 minutes. This step enhances flavor and texture‚ making carving easier. Letting it rest prevents juices from escaping when sliced. Covering with foil during resting helps retain heat without steaming. Proper resting ensures a juicy‚ evenly cooked turkey. Always let it rest before carving for the best results. Resting is a crucial step in achieving a perfect‚ flavorful turkey. Allow the turkey to rest undisturbed for optimal quality. Patience ensures a delicious outcome. Resting is essential for a moist turkey.
Why Resting is Important
Resting the turkey is crucial for retaining moisture and ensuring even flavor distribution. During cooking‚ juices are pushed to the surface‚ and slicing too soon causes them to escape‚ leading to dry meat. Resting allows these juices to redistribute‚ keeping the turkey tender and juicy. Covering with foil during resting helps retain warmth and may enhance the process. The ideal resting time‚ typically 30-45 minutes‚ depends on the turkey’s size. This step also firms the meat‚ making carving easier and cleaner. Proper resting is essential for achieving the best flavor and texture‚ especially in a brined turkey‚ which is already enhanced with added moisture and flavor. Resting ensures a delicious and moist outcome‚ making it a vital step in the cooking process.
How to Properly Rest the Turkey
To properly rest a Trader Joe’s brined turkey‚ start by removing it from the oven and tenting it loosely with aluminum foil. Place the turkey on a large carving board or tray to catch any juices. Avoid covering it tightly‚ as this can trap steam and soften the skin. Let the turkey rest for 30-45 minutes‚ depending on its size. During this time‚ the internal temperature will stay high‚ ensuring food safety. Use a meat thermometer to confirm the temperature remains above 165°F. Do not carve the turkey during this time‚ as it allows juices to redistribute evenly; After resting‚ remove the foil and carve promptly for the best texture and flavor. Proper resting ensures a juicy‚ tender‚ and evenly cooked turkey.
Timing for Resting
The resting time for a Trader Joe’s brined turkey is crucial for achieving optimal flavor and texture. After roasting‚ allow the turkey to rest for 20-30 minutes for smaller birds (12-14 lbs) and 40-50 minutes for larger turkeys (16-20 lbs). This timeframe ensures the juices redistribute evenly throughout the meat. Use this time to prepare side dishes or start making gravy from the pan juices. Avoid cutting into the turkey too soon‚ as this can release valuable moisture. Tenting the turkey with foil during resting helps retain heat without steaming the skin. Proper timing ensures a juicy and evenly cooked turkey when it’s time to carve. This step is essential for a delicious‚ stress-free meal. Always let the turkey rest before serving for the best results.
Additional Tips for Success
Ensure the turkey is tented to prevent over-browning‚ use pan juices for rich gravy‚ and monitor internal temperature for perfect doneness. These steps elevate your dish.
Tenting the Turkey to Prevent Over-Browning
Tenting the turkey with aluminum foil is an excellent way to prevent over-browning‚ especially during the initial roasting phases. Lightly grease the foil with butter or oil to avoid sticking and ensure even cooking. Cover the breast area or the entire turkey loosely‚ allowing steam to circulate while shielding it from direct heat. This technique helps maintain moisture and promotes even browning. Remove the foil during the last 30 minutes of cooking to achieve a golden-brown finish. Tenting is particularly useful for brined turkeys‚ as their higher moisture content can lead to rapid browning. Adjust the foil as needed to balance crisping and protection.
Using the Pan Juices for Gravy
After roasting the turkey‚ the pan juices can be transformed into a flavorful homemade gravy. Start by carefully pouring the juices from the roasting pan into a measuring cup or gravy separator‚ discarding any excess fat that rises to the top; Skim off additional fat with a spoon or paper towels for a clearer gravy. Bring the juices to a simmer in a small saucepan and reduce slightly to concentrate the flavors. In a separate bowl‚ whisk together a slurry of flour or cornstarch with a splash of cold water until smooth. Gradually stir the slurry into the simmering juices‚ whisking continuously to prevent lumps. Season with salt‚ pepper‚ and herbs to taste. Continue cooking until the gravy thickens to your liking. Serve hot alongside the turkey for a delicious‚ savory complement to your meal.
Checking Internal Temperature
Checking the internal temperature is crucial for ensuring your Trader Joe’s Brined Turkey is cooked safely and evenly. Use a meat thermometer to measure the temperature in the thickest part of the breast and the innermost part of the thigh. The turkey is fully cooked when it reaches an internal temperature of 165°F. Avoid touching the bone or fat with the thermometer‚ as this can lead to inaccurate readings. After cooking‚ let the turkey rest for about 20-30 minutes‚ during which the temperature will rise slightly‚ ensuring all parts are evenly cooked. Always prioritize proper temperature checks to serve a delicious and safe meal.
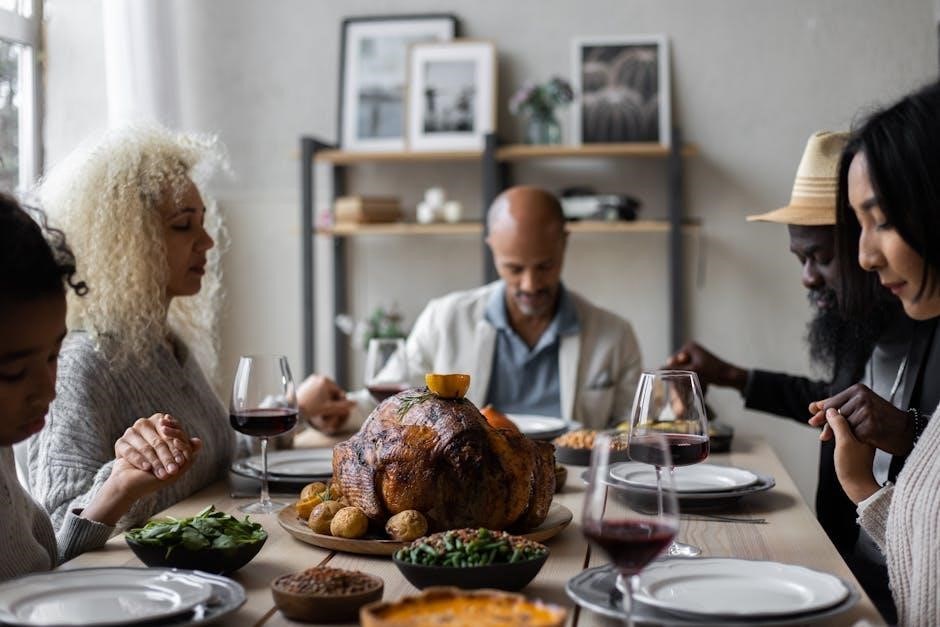
Serving and Enjoying
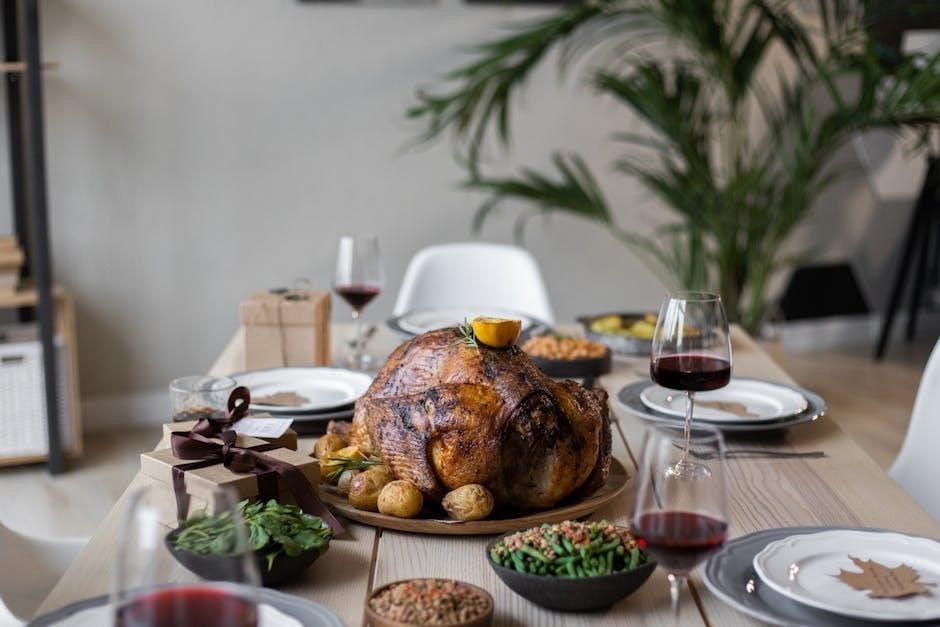
Once rested‚ your Trader Joe’s Brined Turkey is ready to impress. Carve thinly‚ arrange attractively on a platter‚ and serve with your favorite sides like mashed potatoes or stuffing for a memorable meal.
Carving the Turkey
Carving your Trader Joe’s Brined Turkey is the final step before enjoying your delicious meal. Start by placing the turkey on a stable carving board. Use a sharp knife and carving fork to ensure clean‚ even slices. Begin by slicing along the breastbone‚ gently prying the breast meat away from the bone. Cut thin‚ uniform slices‚ working from the thickest part of the breast downward. For the thighs and wings‚ separate them at the joints and slice the meat into manageable portions. Arrange the slices attractively on a platter‚ ensuring each piece is evenly distributed. This method ensures a professional presentation and makes serving easier for everyone. Let the juices collect in the carving board to drizzle over the turkey or use for gravy. Carve just before serving to maintain warmth and flavor.
Presentation Ideas
Presenting your Trader Joe’s Brined Turkey in an appealing way enhances the dining experience. Start by placing the turkey on a large‚ attractive platter or carving board. Garnish with fresh herbs like rosemary or thyme sprigs for a fragrant and visually appealing touch. Add sliced fresh fruit‚ such as oranges or apples‚ around the turkey for a pop of color and festive vibe. Arrange the sliced turkey neatly‚ ensuring even portions and a balanced layout. Drizzle pan juices over the turkey to add shine and highlight the flavors. Consider adding a few whole pieces‚ like drumsticks‚ for variety. Surround the turkey with side dishes like mashed potatoes‚ stuffing‚ or roasted vegetables to create a complete‚ inviting spread. This presentation makes the turkey the centerpiece of your meal and ensures a memorable experience for your guests.
Pairing with Side Dishes
Trader Joe’s Brined Turkey pairs perfectly with a variety of classic side dishes that complement its rich‚ savory flavor. Mashed potatoes are a timeless choice‚ as they soak up the turkey’s juices beautifully. Stuffing‚ whether cooked inside the turkey or in a separate dish‚ adds a satisfying texture and herbal notes. Roasted vegetables like Brussels sprouts‚ carrots‚ or sweet potatoes provide a delightful contrast in texture and flavor. Green beans‚ either sautéed or in a casserole‚ offer a fresh‚ crunchy element. Cranberry sauce adds a tangy‚ fruity contrast‚ while gravy ties the meal together. These side dishes create a balanced and flavorful meal that highlights the turkey’s moist‚ brined goodness.